How to Restore Old Photos (Without Losing the Face)
Every tool will hand back something cleaner. Here is how to tell whether it handed back the same person.
"It seems that when the photo has been restored, that it has changed the look of her face. Is there anyway to make changes without changing her?"
That is someone posting in a photo-restoration group, and it is the question most people are asking about photo restoration. Ninety thousand people a month look up how to restore old photos. The results are landing pages for restoration apps, app store listings, and forum threads where people ask strangers which one to trust.
The gap is in knowing what to look for. Restoration software is very good at removing damage and much worse at telling you when it has removed the person along with it.
So, the short answer before the steps: try the free option first, keep one untouched copy of everything, and check the face against another photograph before you accept any result. The rest of this is how.
What Makes This Hard
What kind of damage are you looking at? It matters more than the tool does, because these are not the same problem:
Fading. The picture has gone pale, or drifted orange. The most common problem, and the most fixable.
Surface damage. Creases, scratches, a torn corner. Software rebuilds these well, as long as they are not across a face.
Softness. Either the print was never sharp, or your copy of it isn't. Opposite problems, opposite fixes.
Missing information. A face in deep shadow, a section torn away, chemical damage that has eaten into the picture. It can't recover what isn't already there.
The last one is where people lose perspective. Give one a damaged face and it hands back something sharp and clean and confident, but unreliable. It has not uncovered what was there. It filled the gap with what a face like that usually looks like: the right age, the right light, the right angle, but not your grandmother.
Close doesn't help. Her eyes sit fractionally wrong, or the mouth belongs to someone else, and the family looks at it and knows something is off. Once it's shared, the original copy, creases and all, has been replaced on the phone by the now clean and unreliable one.
The amount of invention is not random. It tracks how much real detail the software had to read in the first place. A soft, low-resolution face that is still structurally whole gives it plenty to work from, and it will mostly stay honest. A face with a tear through it has no readable information, so it guesses. The result depends on how much of the real face survived, and how much of it made it into your copy.
Everything Begins With The Copy
People spend an hour choosing between restoration apps and less than thirty seconds photographing the print. That is backwards. The tool matters far less than the copy: if the detail never made it into your photo of the photo, every tool gets pushed toward inventing facial features to fill the gap.
Flash causes glare and blows out the exact part of the picture you care about. Holding the phone at an angle turns the print into a trapezoid. Your own shadow falls across it. Stand too far back and the photograph fills a third of the frame instead of all of it.
A flatbed scanner at 600 dpi captures more information than a phone can. Worth borrowing if you have a boxful, not worth buying for one picture. Google PhotoScan is free, corrects the angle, and takes out glare, provided you walk through its steps rather than taking one quick shot.
Steps For A Successful Restoration
1. Get it out of the album, or leave it where it is.
Old prints stick. An album page with adhesive backing and film over the top: try one corner with light pressure, and if it resists, stop. No heat, no water, no pulling. Photograph it through the film instead. You can work with a hazy copy. You cannot un-tear a print.
2. Make the copy, and put it somewhere safe.
Daylight near a window, never direct sun, never flash. Print flat on a plain surface. Phone directly overhead, screen parallel to the print, close enough that the picture fills the frame. Tap the face on screen so focus lands there. Take four, shifting slightly between them, and pick the sharpest later on a proper screen rather than on the phone.
Save that file somewhere you will not overwrite it. Everything after this happens on duplicates. Ruin one and the original is still sitting there.
3. Name the damage before you fix it.
On the largest screen you have, work out which of these you actually have. Faded but intact goes to step 4 and takes a minute. Creased, with faces clearly visible, also goes to step 4. Damage across a face goes to step 5 or 6. If it looks soft, check the print itself under good light first: if the print is sharp, your copy is the problem, and you want to reshoot rather than restore.
4. Try free first.
Open the copy in whatever editor came with your phone. Auto-enhance, then adjust exposure and warmth by hand. For a photograph that has only faded, this is the whole job, and it costs nothing. Do this before paying anyone.
5. Then pay for the stack.
For creases, scratches, spotting, or color that has drifted past correcting by hand, you want something built for it. What to look for is a tool that treats the face and the rest of the picture as two separate jobs, so the scratch repair never runs across a face and the face work is set to stay close to the original rather than to flatter it.
Ours works that way. No step in it takes a text prompt. Every stage works only from the image itself, so nothing along the way can be told what a face is supposed to look like. PicToLife restores a photo for one credit, with 25 credits in the $6 starter pack and no subscription.
Upload the copy you made, keep your original file, and run the check in step 7 anyway.
Photoshop only if you already own it and know it. Time spent learning it for one photo is not worth the trade.
6. Pay a person for the irreplaceable one.
One photograph with real damage, a tear through a face or water across the middle of the subject, is a job for a human retoucher. Twenty to eighty dollars, a few days, and someone making judgments software is unable to make: what her jaw probably looked like, inferred from the rest of her face and from other pictures of her.
Choose someone showing before-and-afters of damage like yours. Send your best copy along with other photographs of the same person. The retouchers who ask for those are the ones who know what they are doing.
7. Check the face. Every time.
Put the restored version beside your untouched copy, full size, and look at the eyes first, then the width of the nose, then the jaw. Then compare it against a different photograph of the same person from around the same years.
If it looks better but she looks less like herself, keep the original.
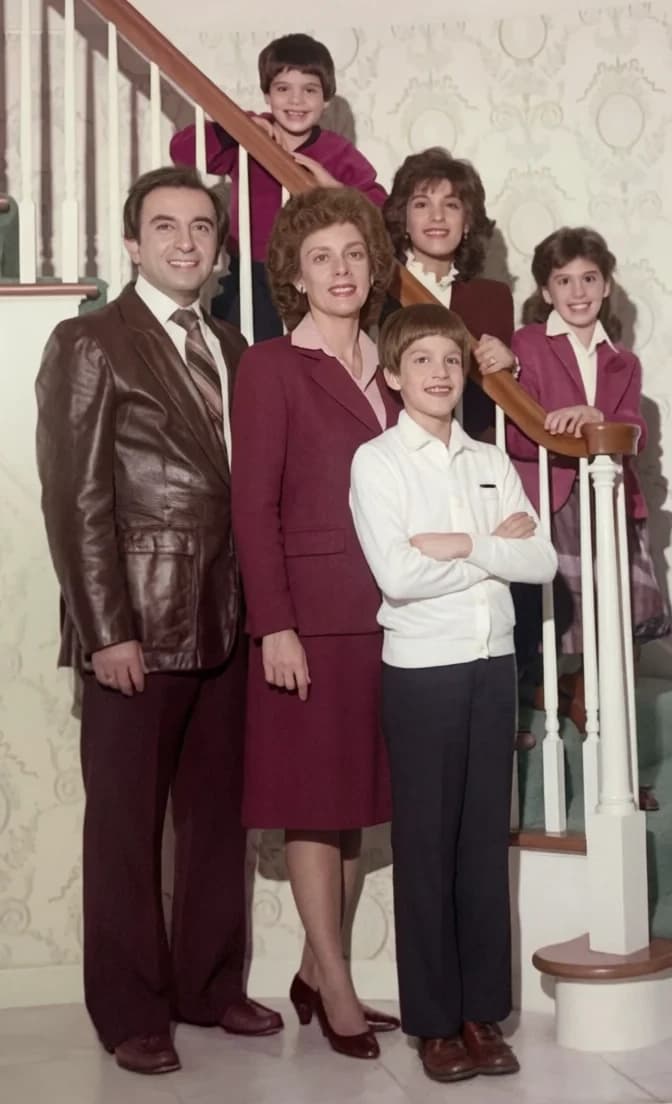
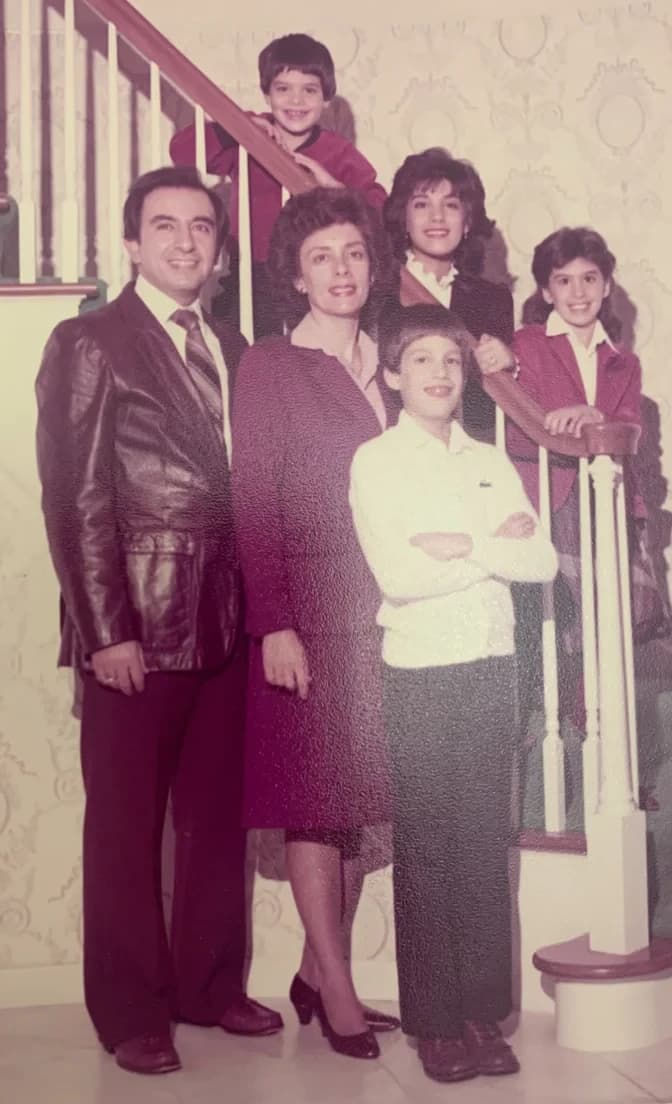
The slider above is ours, and it drags. A family portrait from the 1980s that had gone heavily magenta, and the same people underneath it. Run this step on it yourself: eyes, then the width of the nose, then the jaw.
Every photo you restore with us comes back with a slider of its own, for the same reason.
8. Two copies, two places.
The finished version and the untouched copy, both, somewhere that is not only your phone. A cloud account and a drive at a sibling's house. Print one as well. Paper in an envelope outlives every file format you will ever choose.
Where to Actually Get It Done
Worth knowing before you drive anywhere. Walgreens discontinued photo restoration in February 2024, and most drugstore counters now scan, crop and reprint rather than repair. CVS still offers restoration through a partner lab, starting around $39 for one photograph returned as prints and a disc.
Fair price for one irreplaceable image. Wrong price for a boxful. For a box, an online tool is the only sensible option on cost. For a single photograph with damage across a face, a human retoucher is worth paying for.
Before You Start
Photograph the print, save that file untouched, and work only on copies of it.
Everything else on this list can be done again tomorrow. That one can't.